12.11.2011

Back to Renovation

So after living in the house for 7 months, and sleeping in the guest room, we have finally started renovations on the master bedroom!  I am very excited.  As you might remember, there is a master half bath which we disassembled during our initial run-through of the house. 

There were at least 5 different shelves on the wall, a very old medicine cabinet, and a cheap looking vanity with no storage space.  We basically ripped everything out and started fresh.  As part of our contract, the seller had to install a new toilet, which is the only thing that stayed in the room. Unfortunately I can't really find any good photos of the bathroom before we ripped everything out, but it was a mess.

I spent a long time spackling, sanding and sponging down this room.  Probably more than any other space in the house.  But looking at it again, I am realizing that I'll need to spackle and sponge again.  Sigh.

Anyway, here are our plans for the master half:


New vanity.  Obviously we needed one, and we bought this one months ago.  It's narrow, because there's not much available space, and we don't want to feel smushed, but the sink extends a little bit, so that we don't lose sink space.
MagickWoods vanity from Lowes
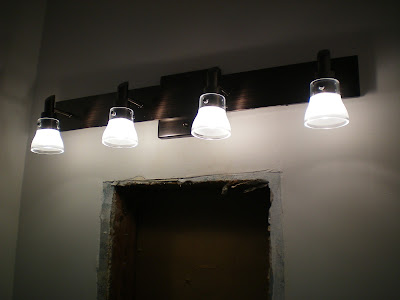
New light fixture.  My dad installed a new wall fixture, but now we have the problem of the exposed j-box in the ceiling.  So we bought a new ceiling fixture, which gives off more of a gentle glow, that we will have in addition to the wall fixture.  It saves us the annoyance of trying to close up the ceiling or wall. 


New medicine cabinet.  Another item that we bought months ago and has been waiting patiently to be installed.

We have also been talking about re-doing the tile on the floor and tiling up the wall behind the sink.  We bought some samples of tile that we may be using.


We would like to keep the tiles light because it's a small room, and we want to make it look open and light.  I still want some color, though, so we decided that we would use a lighter tile on the floor and colored tiles on the wall.  The wall color will be a lighter shade of the color we chose for the bedroom.

Sample on the bedroom wall.
Floor tile options.
Wall tile options.
After looking at the floor tiles we decided that we really like the octagonal porcelain tiles.  I love that they're a little bit different.  We weren't so sure about which wall tiles to choose.  We eliminated the darker one right away, because they were too brown.


After taking at closer look at the tiles, we still weren't sure which to choose.  So we went to the ultimate deciding factor: the price tag!  The smaller 5/8" tiles were $10.98/sf, and the larger 1" tiles were $4.97.  Ding ding ding, we have a winner!  The wall is 24sf, which means the larger tiles will be about $120, and we will be saving $143 by going with the cheaper tile.  The floor tile is $2.54/sf, so it will be approximately $46 total.

So we'll be starting the demo of the floor shortly, and I'm excited to get started on another project!  It feels like all we've done in the past few months is put up trim.  I also can't wait to get the master bedroom finished so we can finally move in!

12.08.2011

The Tree, and Other Holiday Decor

Our tree is up and (mostly) complete. I'm still working on a couple of DIY ornaments, which I'm not even sure I'll get finished by Christmas. 


While we both really wanted a live tree, I am very paranoid about water getting on the wood floors.  I bought a large oil pan at Walmart, typically used to catch oil under parked cars.  I figured that any water that might spill over the lip of the tree stand will be caught by the pan, and not sit under our tree for a month.  The pan is almost completely covered by the tree skirt, and the part that isn't is in the back and hardly noticeable.  I guess we'll see in a few weeks how well that worked!

I bought the tree skirt at Homegoods because I thought it was adorable.  It was also only $20, score!  I love the home-made feel.  


I am really happy with the new glass ornaments we got this year, but I'm thinking that the green ones blend in a little too well with the tree, and it makes some spots look really bare.  I'll probably end up getting some different colored ones in the January after Christmas sales to add a different color. 

I'll also post my "mantle" AKA bookcase.  We used thumb tacks to attach our stockings to the bookcase.  We did it from the inside so there's no noticeable marks. 


I also got a faux mini-tree for the mantle.  I bought some red glittery balls and am planning to hot-glue them to the tree for a little festive sparkle. 

You might notice the santa figurines from my flea-market trip in September.  Yup, those babies cost me $.50 each. 


I also re-used the cranberry centerpieces from Thanksgiving. 


I'm pretty happy with everything so far.  I still have a couple of ornaments and decorations to make.I have also taken over the dining room table with Christmas crafts.


Is everyone else ready for Christmas?  Or will you be making things up until the last minute, like me?

12.05.2011

Happy December!

I was lucky enough to be staying in New York City last week for work.  They had the annual lighting of the Rockefeller Center Tree on Wednesday night, and while I missed the ceremony (I had to work late), I did get to see it.

December is exciting for me because it means I can finally start decorating for Christmas!  And this is the first year that we've had a house to decorate, so I'm kind of going crazy.  Plus, there are a million awesome Christmas craft ideas on Pinterest, and I want to do them all! 

I love felt ornaments.  Luckily, there are some that aren't too hard to make.  I found a very cute template for a peppermint felt ornament on Pinterest, originally from Pink Suede Shoe

Materials:
Red and White felt ($.29 each)
Ribbon
Needle/Thread


I started by cutting the felt using the free template that I printed from Pink Suede Shoe.

Then I sewed the swirl pattern to the circle of the peppermint. 

After both sides were done, I turned the pattern inside out, facing the front of the peppermint pieces towards each other, and sewed 80% of the way around.


I turned the peppermint inside out, added a ribbon, and finished sewing.  I completed the ornament with a ribbon.


Pretty cute, right?

I also saw an awesome ornament wreath on Matt & Becky, which I decided to try for myself.  Matt and I had bought a lot of plastic ornaments for our first Christmas tree last year, but this year I wanted to upgrade to glass.  I decided to use the old plastic ones for the wreath.  I don't know if I'd try this project with glass balls, just because if one of them breaks it would be annoying to replace it. 

Materials:
Plastic Ornaments (I used ones we already had, and bought some smaller ones for $4.50)
Wreath ($10, on sale for $7)
Hot Glue Gun

I started by using hot glue to attach the larger ornaments randomly on the wreath. 

I continued to fill in the wreath with the larger balls, trying to space the colors so they weren't grouped too much together.  Once I had placed most of the larger balls, I started adding the smaller ones in to fill the holes.


I'm very pleased with it.  The only problem is that it's too wide to fit between the front door and the storm door!  I'm still not sure where I'm going to hang it.  Maybe I'll try hanging it on the outside of the storm door. 

Has anyone else been working on holiday crafts?  I have some more coming up, plus my holiday decor. 

11.27.2011

Thanksgiving

So November is almost over, and I have ultimately been unsuccessful in my NaNoWriMo attempt.  I fell behind early on and then had some problems with my storyline.  And anyway, this means I'm back to working on the house and blogging!  I've actually missed posting on here in the past month. 

Matt and I hosted Thanksgiving this year.  I made some centerpieces for the table:


I already had the tablecloth and the mason jars.  I bought flowers from the supermarket ($15) and cranberries ($6).  I filled the mason jars with flowers and cranberries.  Flower tip: whenever I put flowers in a vase, I add a little bit of bleach to the water.  It helps to keep mold from growing, and I also think it helps preserve the flowers.

Also, I am reusing the cranberry jars as Christmas decor.  I did have tea lights in the cranberry jars, but it turns out unless the tea lights are completely flat, they burn out quickly, and it's difficult to get candles to lay flat on top of cranberries.  Next time I'll try votives. 

I hope everyone had a great Thanksgiving!  I'm really excited for Christmas, and will be posting my Christmas decor soon!

11.08.2011

Taking a Small Break

I just wanted to let everyone know that I'll be taking a small break from DIY and blogging for the month of November while I work on my novel for NaNoWriMo

If you are unfamiliar with NaNoWriMo, it stands for National Novel Writing Month, and it is basically a challenge to write a 50,000 word novel in the month of November.  Since 50,000 words/month = 1,667 word/day, I'm not really planning to do much else this month except write (and I'm already behind, eek!). 

I also want to thank Nette at This Dusty House for giving me a blogger award!  I'm very flattered, and I'm glad she's enjoying my blog as much as I enjoy hers.

I'm off to write more, now, but check back in December.  We've got some great projects planned!

10.30.2011

Kitchen Bookcase

The bookcase was one of the first projects we started in the house, and we finally finished!  The whole project has been an exercise in patience.  We started with a tiny pantry barely wide enough for a can.  The door also opened into the doorway.  We didn't like the location so we decided to open it up into a bookcase, which makes the small doorway seem larger and can hold my large collection of cookbooks.
Original pantry with the door removed.
After taking off the door, we removed the shelves and door frame.

Pantry with door frame removed.
We had to add new drywall, because the inside was wider than the frame.  We ended up losing a few inches on each side, but we gained about 6" front to back.

New drywall.


Spackling the drywall.
So after the drywall was up and spackled and painted, we added shelves, which we didn't get a chance to paint because we just wanted it done for the housewarming party.


So we were able to get it to look OK for the party, but it was far from finished.  This is how the bookcase stayed for the next 4 months.  One of the reasons I procrastinated so much in finishing the bookcase, aside from other projects getting in the way, was that I was planning on closing in the bottom.  But then I had to cat-sit for my mom, and we realized that the bottom of the bookcase was a perfect place to put the kitty dishes.  Since we're planning on getting a dog, we decided to leave it open for future doggie bowls.

The other reason I didn't want to finish it was because I needed to spackle again.  I hate spackling.  When I originally hammered in the shelves, the drywall moved slightly, and large cracks appeared at the back of the bookcase.

You can kind of see the cracks from this distance.

And you can definitely see them up close.

So I finally decided to spackle.

And more spackle.
Sponging down the spackle.
 Ugh, that sucked.  But now it's done.  I also decided, since I had to repaint anyway, that I would paint the inside white instead of the same gray as the rest of the kitchen.  I thought it would help the bookcase to stand out and appear brighter.

Bookcase with 1 coat of white paint.

I gave the shelves 3 coats of paint on each side.
We decided that since the tiles on the floor of the bookcase are weird (because of the former door frame) that we would add a rubber mat on the floor.  It would be easier to clean when we use it for a pet food buffet, and will cover up the mess of tiles on the floor.
We picked up this rubber mat from Home Depot for $6.50.

We used a utility knife to cut the mat down.

Then we slide the mat in, and it fit!


After we put down the mat, we added the rest of the trim and put in the shelves.
After the trim was in, the base looked so much more finished.


We added the books and some other knick knacks, and the bookshelf is complete!
Finished!  The streamers are for my brother's graduation party.

yay shelves!

Completed built-in bookcase.
 So there you have it, how to make a built-in bookcase in 6 months :)